Glossary
Here are definitions and references to terms used for discussing RAPID Platform functions and features.
RAPID Experience
Experiences are self contained interfaces that interact with your site data for some purpose. These include:
Explorer
A looking glass into your data. Explorer focuses on enabling users to see / edit / delete items in your site for any purpose. Suited best for direct data management.
You can get to Explorer via the quick link buttons at the bottom of your main site menu.
Workflow
Based on the popular BPMN 2.0 workflow diagram specification, workflow focuses on letting users create and manage process diagrams that document their activities. With a built in processing engine, Workflow can also automate aspects of your business.
You can access Workflow from the quick navigation buttons at the bottom of your main site side bar.
Related articles Workflow User Manual
Designer
Designer provides a means to manipulate and control your site. It enables defining what Tables and Columns your site contains, managing pages and views and a slew of minor administration activities.
You can access Designer from your main Rapid site using the navigation bar on the bottom of the menu.
Related Articles
Tasks
Tasks focuses on helping Users to quickly find and manage their tasks.
Tasks is accessible here.
Data Table
A data table is a collection of data organized across columns.

Here,
- Title
- Guide Author
- Owner
- Link
- Business
are columns that organize the data about various items in the table.
Table
A table defines the shape of data across various columns. The term table refers to the list of these columns along with their attributes. Tables also include additional configuration, such as where they store files, the default permissions when creating rows on the table and various default values.
When you are defining column attributes, such as:
- Column name
- Field Type
it is called defining the Table structure.

Rapid Platform allows defining of data table structures that suits information needs, using the Designer application.
Related articles
Command bar
A command bar is the horizontal area containing command buttons like Save, Delete, Add new item etc. Command bars are typically found at the top of a region containing data, such as a table, board, Gantt chart and item profile.
Command bar in Table view

Command bar in Item view

Sidebar
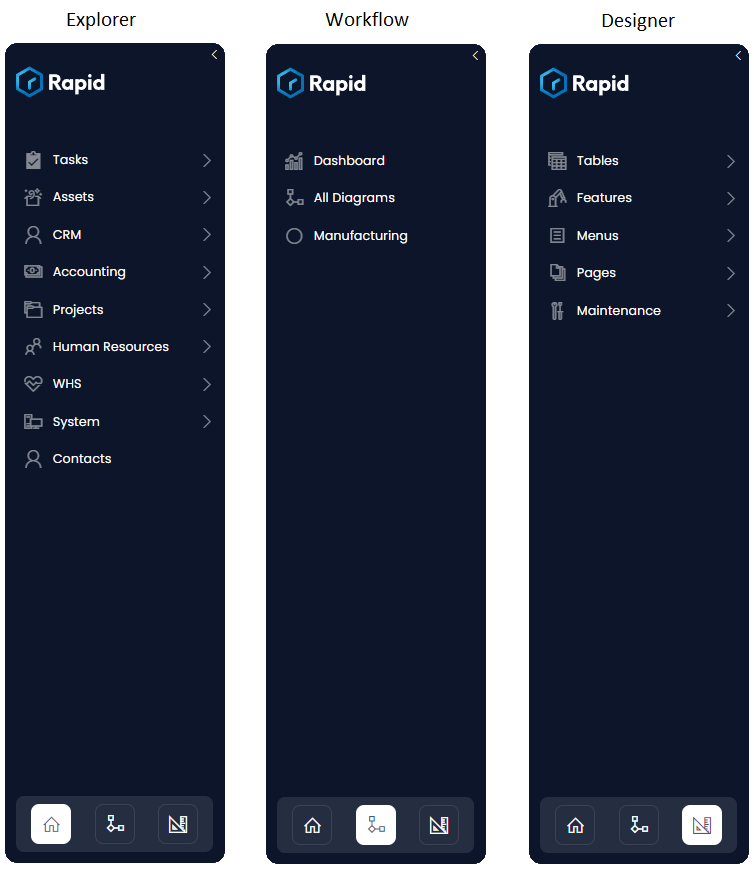
A sidebar is a collection of Menu items for easy navigation to various pages in RAPID Platform.
Each experience between Explorer, Designer and Workflow have their own sidebars. All contain the quick navigation buttons to jump between the three.
Menu
A menu can be most fundamentally be perceived as a button.
There are two types of menu buttons:
-
In the Sidebars

-
In command bars

The On-Click Action of the menu button can be configured.
Rapid Platform allows for several different types of On-Click Actions that can be used to customize the experience for your Users.
Related articles
Menu item
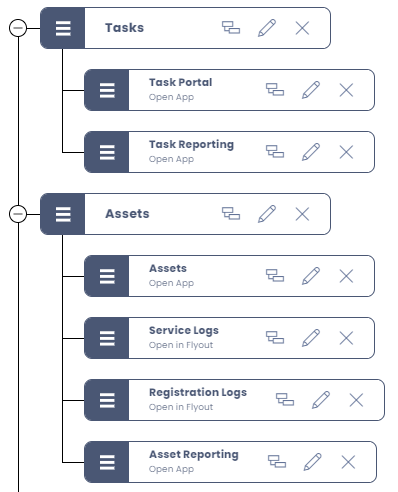
A Menu item is an item added in the menus list. This item is configured to give a menu button desired properties.
Each of the below shown in the tree is an example of menu item.
Related articles
Table items and columns
An item in a table refers to the a single group of related data within a table. Relational databases contain tables with items / rows and columns (also known as records and fields, respectively).
Columns are vertical, and hold a list of values all from the same field. Items are your horizontal elements in a table. The values in an item belong to different fields, but all refer to a single unit (like a row that contains information about one customer or one order).

Inherit Tables
Case Scenario
While conducting routine business operations, you need to collect and store contact information about various stakeholders - for instance - contact information of customers, employees, suppliers etc.
The nature of information stored for each category differs slightly, however, there are certain fields which are common. For example - you would want to store - Name, Contact Address, Email, Contact Number, Bank Account details etc. for employees as well as businesses. So we conclude that each type of stakeholder information will have a mix of - common fields (Name, contact number, Email etc.) and unique fields (Employee Id, ABN number etc. )
A brute-force approach would be to create separate tables (one each for businesses, employees etc.) from scratch. This would involve extra effort in creating columns that are common.
In Rapid Platform, you are not required to create the tables from scratch for each type of stakeholder.
Option 1 - Create a Lookup
The first option, which any relational database user will intuitively suggest, is use of lookups. This approach involves creating one table with common fields and then create another table with unique fields. Linking these tables using Lookup will allow you organize, store and fetch data.
However, imagine a large organisation, storing hundreds of transactions in a day. The volume of data in the table with common fields would bulky. This is because, the common table would be storing contact data for all the stakeholders (businesses, employees, suppliers etc.)
Further, and more importantly, any change made to the common fields will reflect into all the connected tables. For example - you wish to rename a field as Bank Account number as Employee Bank Details. You will have to compromise on such a change as it will make this field irrelevant for Businesses.
Option 2 - Inherit / Sub-Type Of
The other option possible in Rapid Platform, is to create a table with common fields. Let us call this Contacts.
Then create another table called Businesses, which inherits all the common fields from Contacts. Similarly, create another table called Employees, which also inherits all common fields from Contacts.
Inherit all fields means - the table structure of Businesses will copy all the fields as defined in Contacts. You can then easily modify the business column list and add / delete / modify business specific columns to it.
The creation effort for common fields is saved, but it still creates a separate, independent table.
In this relationship
- Contacts table - Parent
- Businesses, Employees etc. tables - Sub-Type Of Contacts
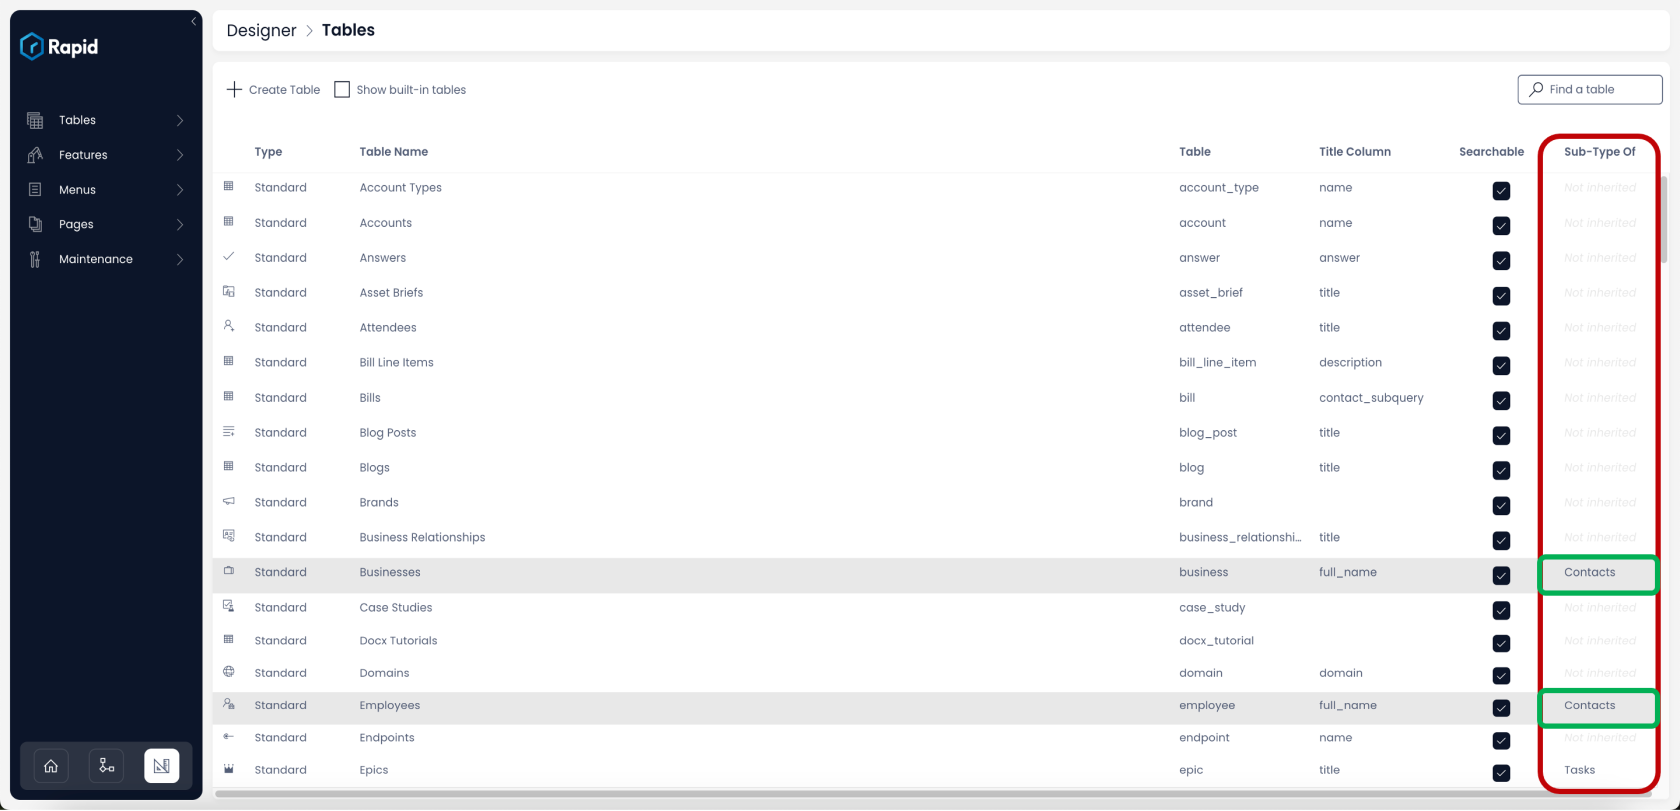
It is easy to identify which table is a Sub-Type of which other table in Designer. The last column displays the Sub-Type of values. If the table is not a sub-type of any other table, then it displays "Not inherited", otherwise it displays the name of the parent table.
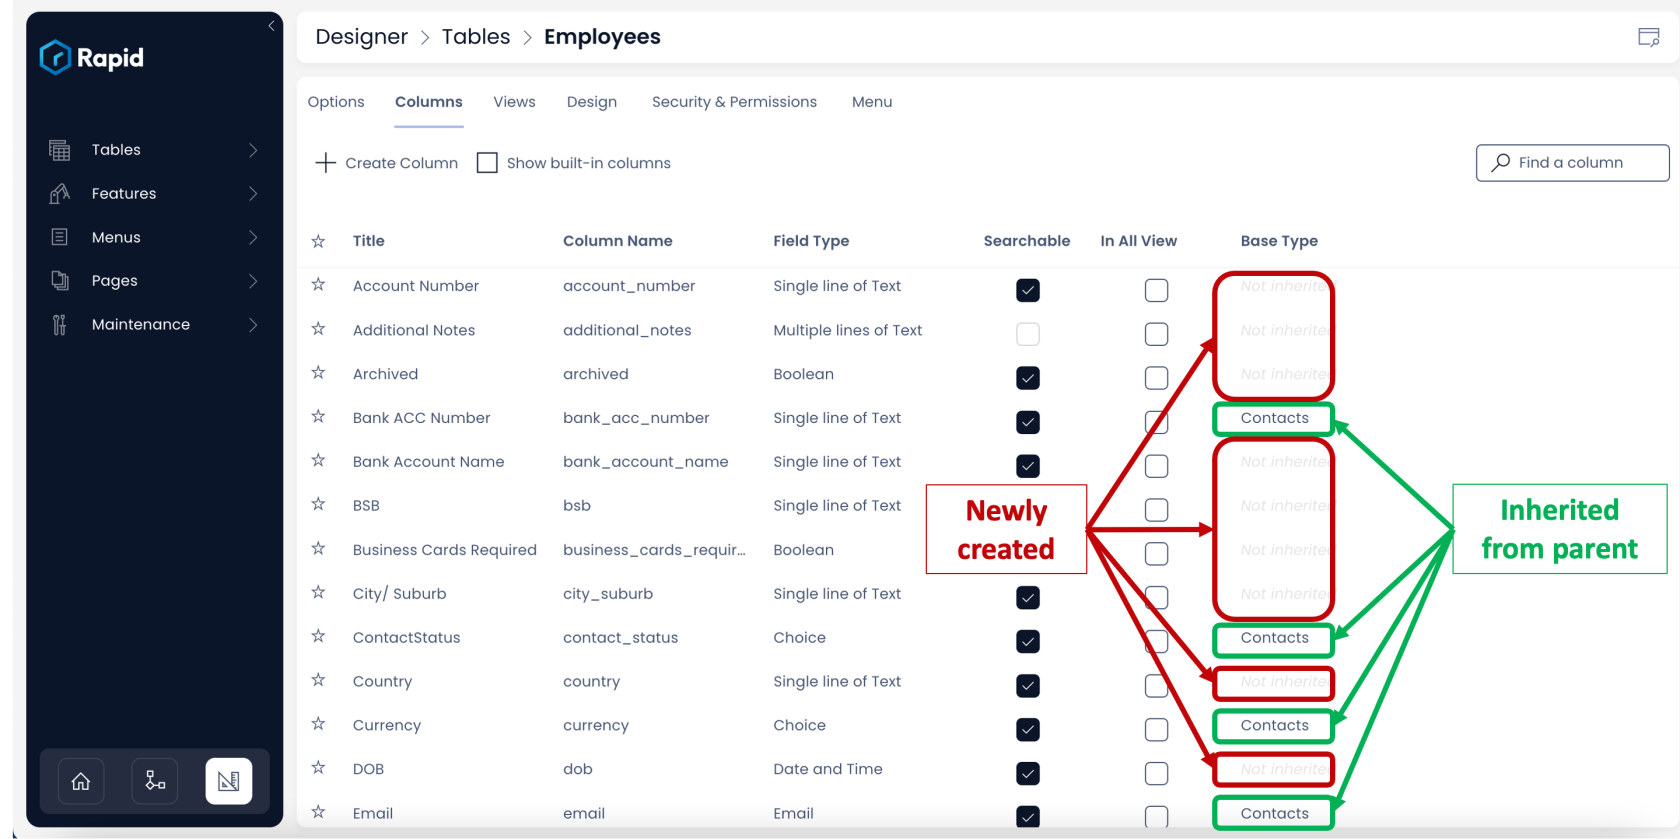
For a particular table, we can easily identify which columns have been inherited from parent and which have been created afterwards. In the columns tab for a table in Designer, you can observe the last column Base Type. For the columns inherited from parent, this column provides the name of the column. For newly created columns, this field will display "Not inherited".
Related articles
How to create a new table in Rapid Platform?
How to view / update table options of an existing table in Designer?
Page, layout and component
Page
A Page is a fundamental element in Rapid Platform. Consider a broad analogy of a blank page of a notebook. You can write something on a page and then this page can be read by others. Similarly, in Rapid Platform parlance, a page can be considered as an area to host components.
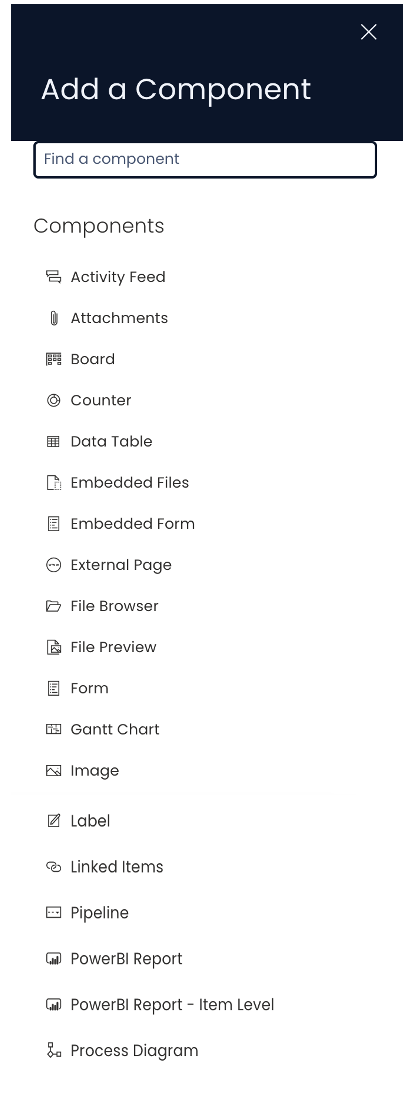
Rapid Platform features components like Gantt Charts, Kanban Boards, Data Tables, Activity feeds, Forms, PowerBI Reports etc.
All of these can be configured on a page for data presentation.
Layout
A layout can be considered as a section on a page. Layouts define the arrangement of components across the page.
Layouts serve three main purposes:
- Without a layout you cannot add multiple components to a page. You can only have one component on a page without layout.
- It assists in defining the arrangement of components on a page.
- If you want to hide / show all the components on Details or Creation, it can be done with a single click
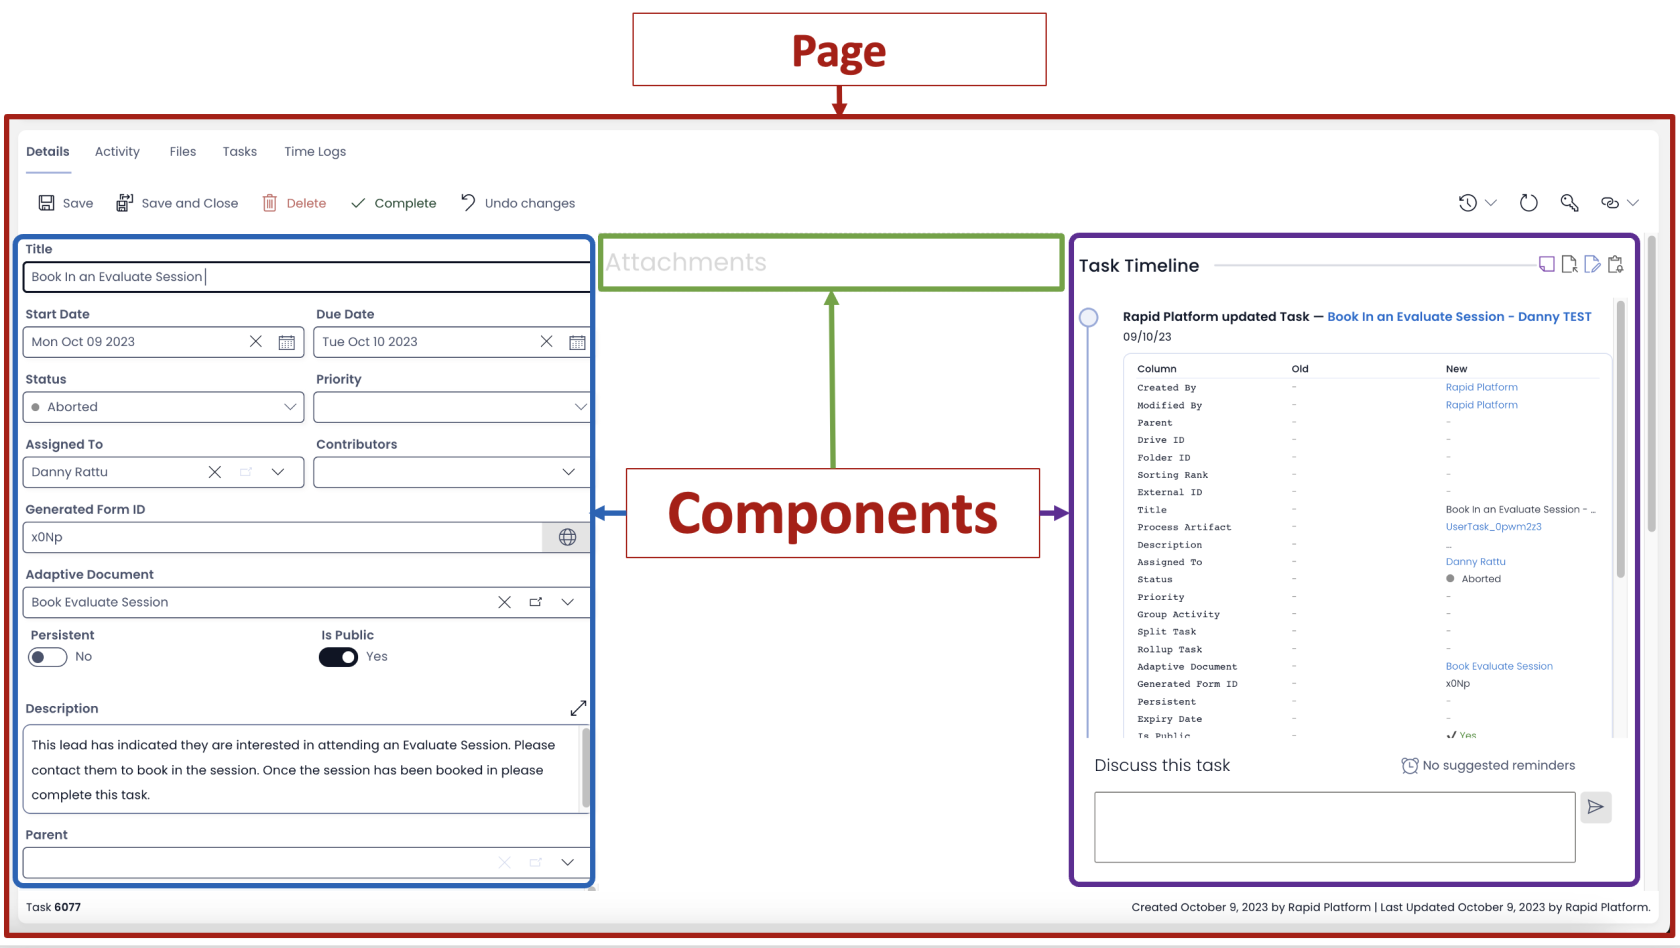
- Every component needs a page where it can be configured.
- A page can have multiple layouts.
- Each layout can have multiple components.
- There are a total of 19 component options that are possible in Rapid Platform.
Task Experience
Task Experience is the name given to a separate environment where a user can manage tasks. This is different from Explorer. Task Experience provides the details about the task along with other essential fields like Due Date, Priority, Task Status etc. Further, the User Interface enables the user to add time-logs against tasks.
The environment is accessed at url - tasks.rapidplatform.com
Support request
A support request is a unit communication between the system user and the system's support staff. A user can create a support request when he/she is not able to proceed with a system functionality on his/her own or with the help of documentation. This indicates the need for assistance and a support request is a method to seek that assistance from support staff.
Users can also use support requests for submit bugs or improvement requests.
Adaptive Documents
Adaptive Document Canvas
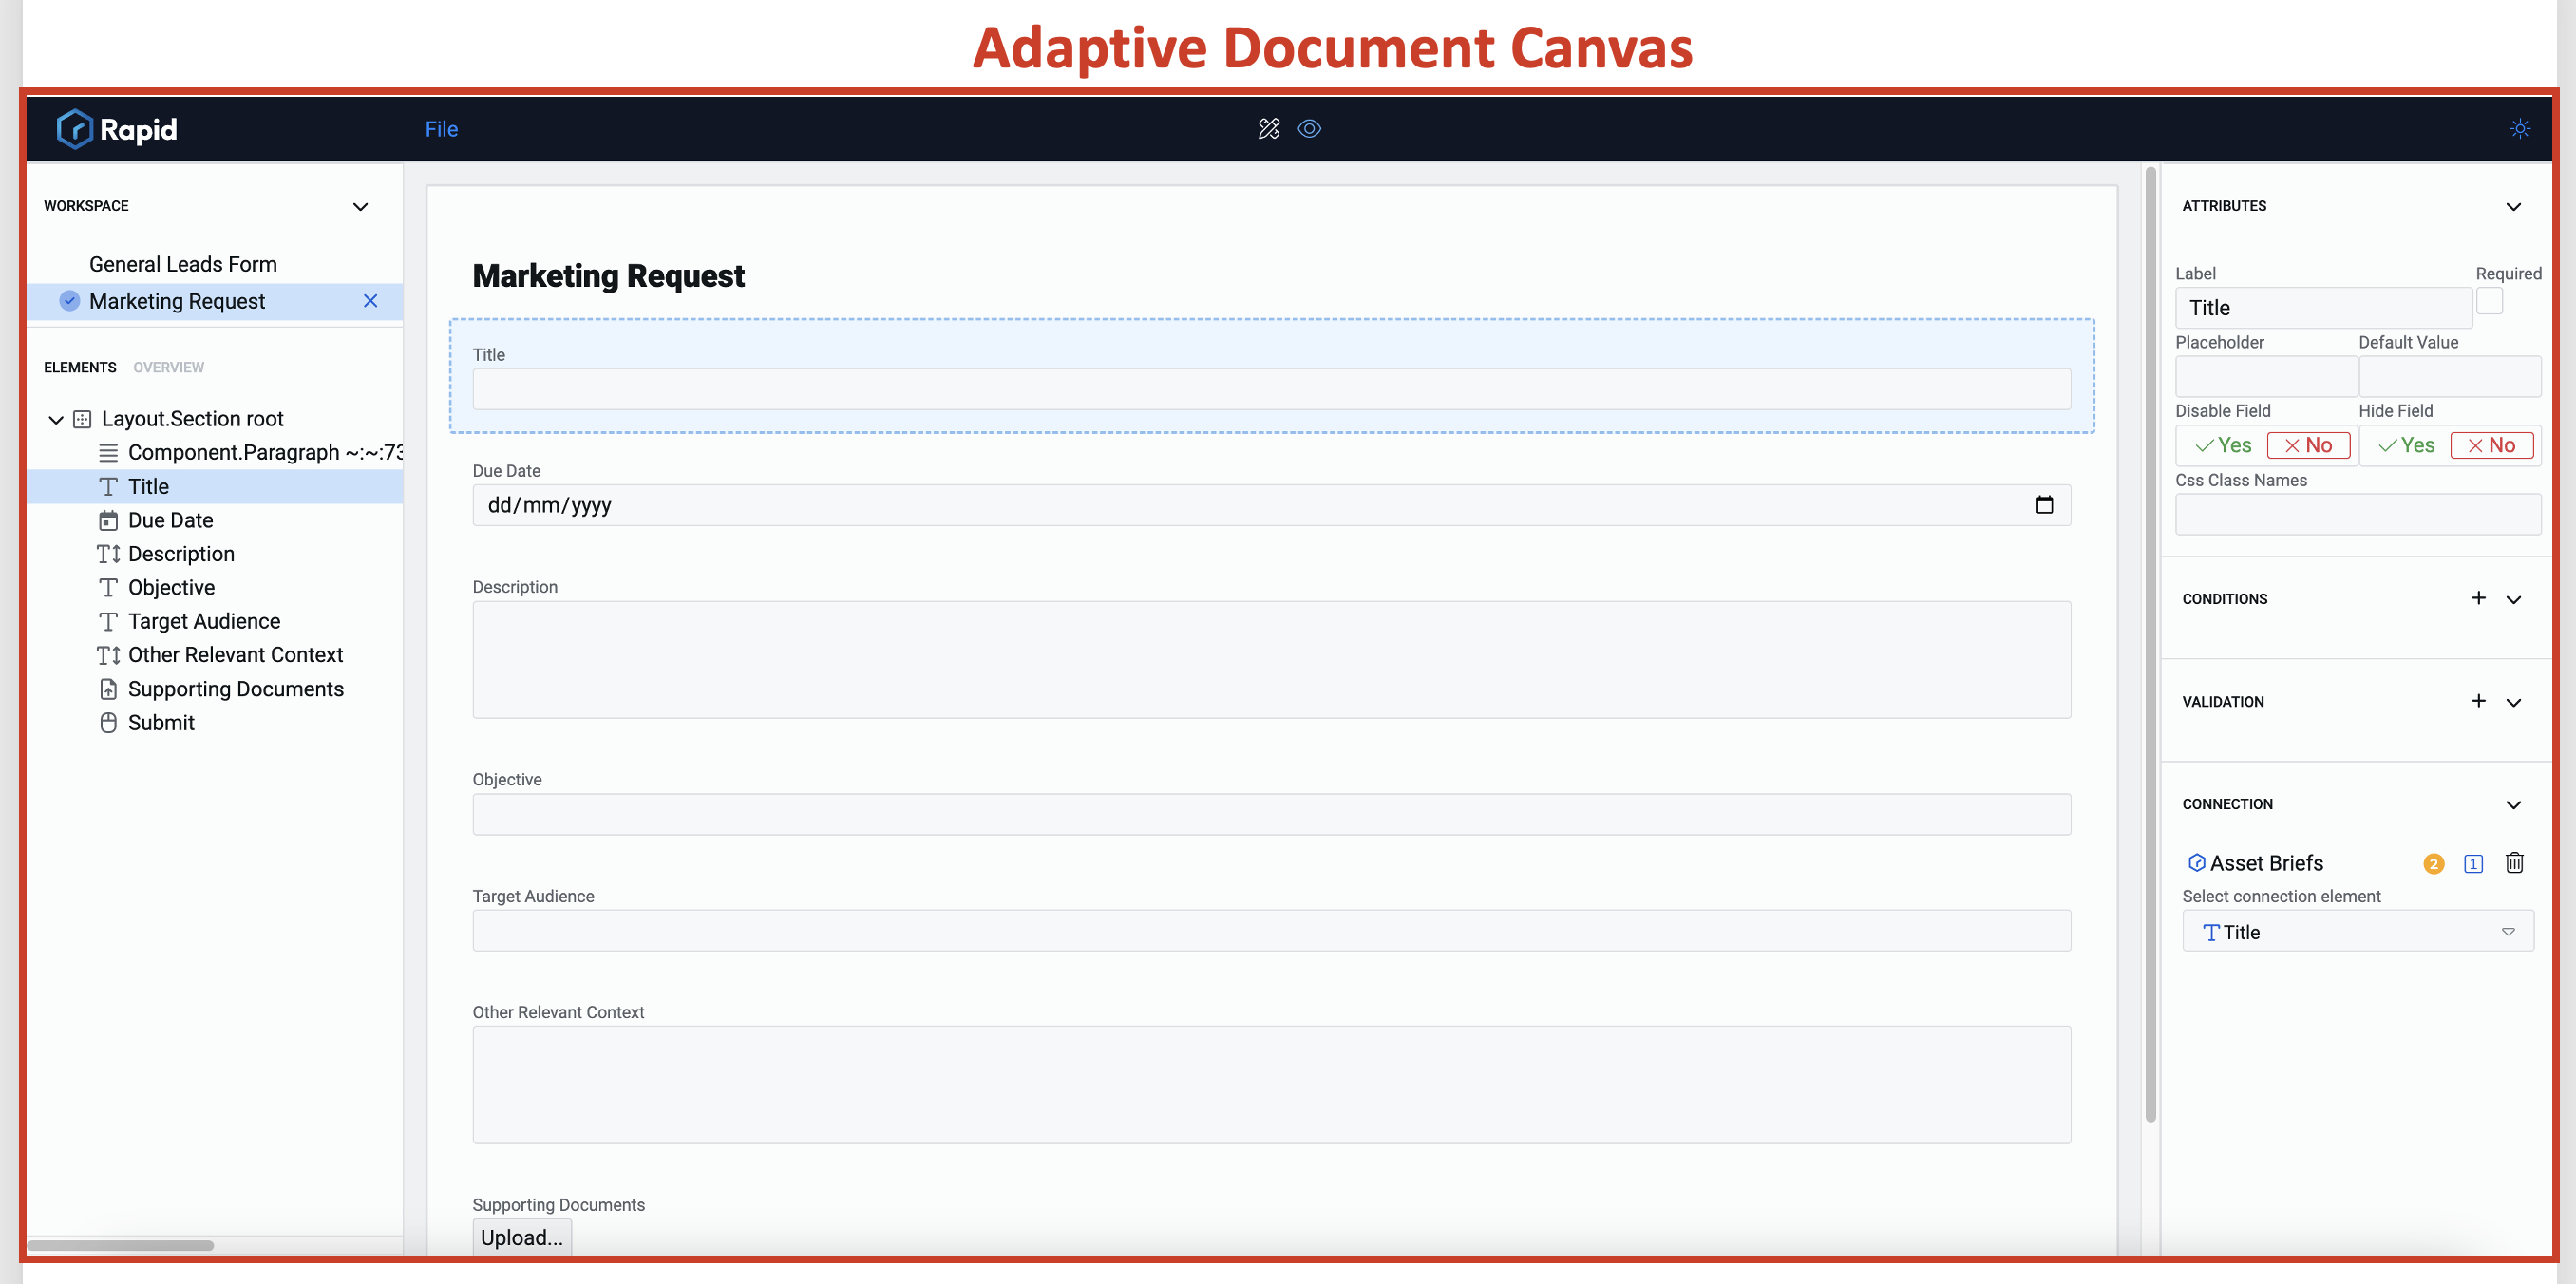
The Adaptive Document Canvas is the interface which allows you to create, open, edit and configure elements of an Adaptive Document.
Document Structure Panel / Tree of Elements
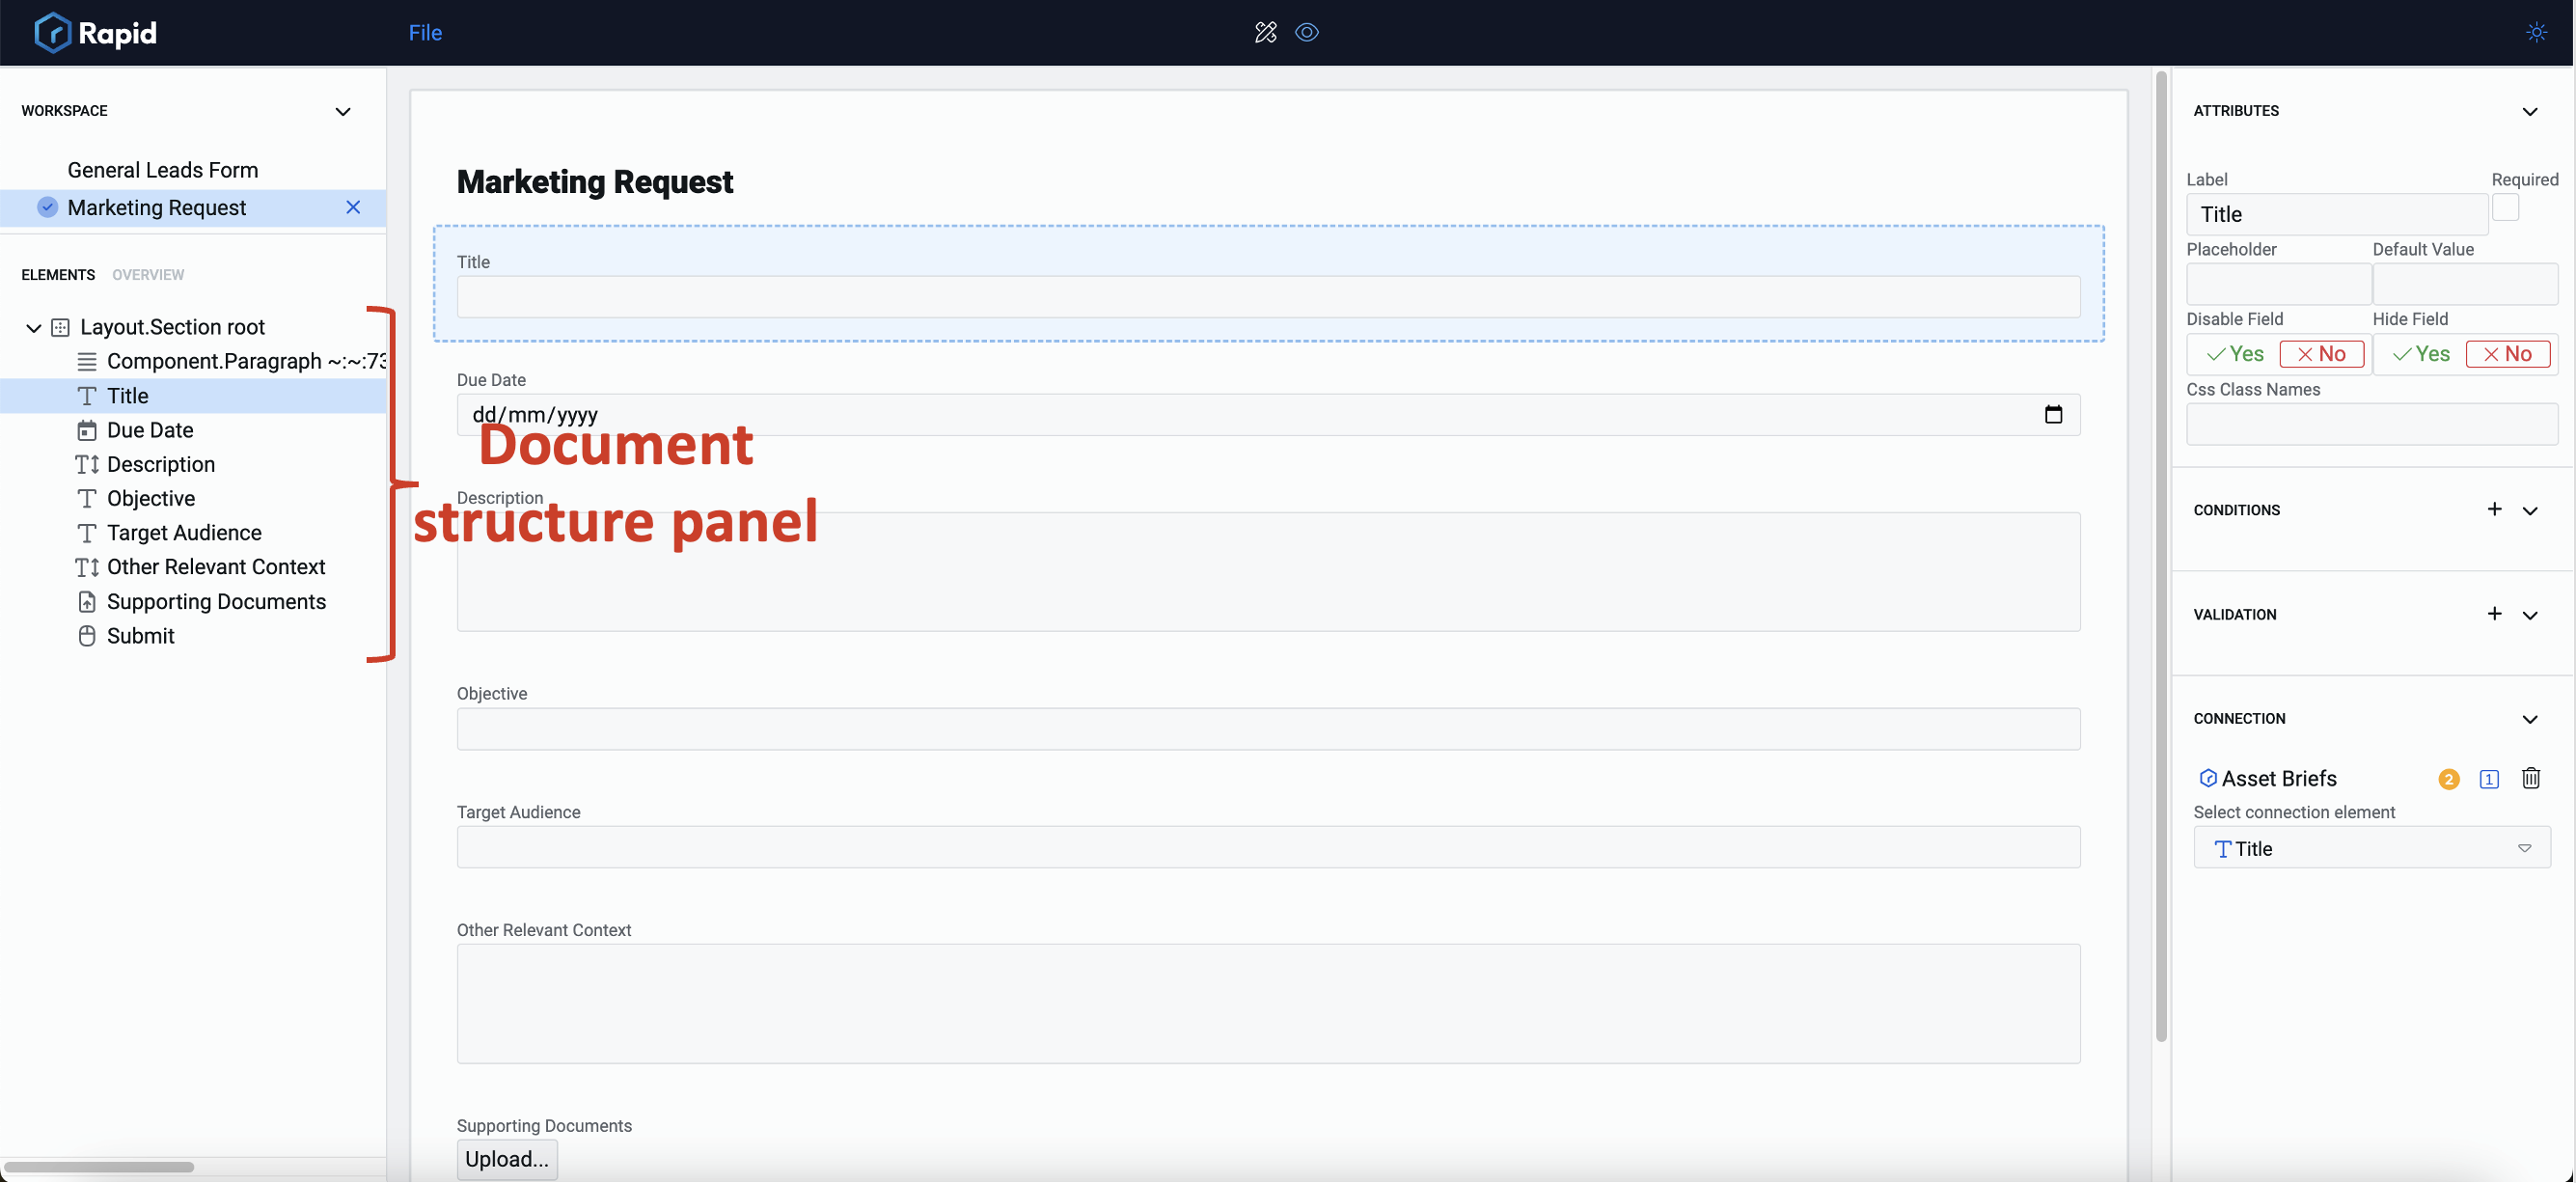
You can scroll up and down to view all the components of the structure. You can click on any of the structural elements to select it on the Composition area, or double click to edit the name of the element.
Composition Area
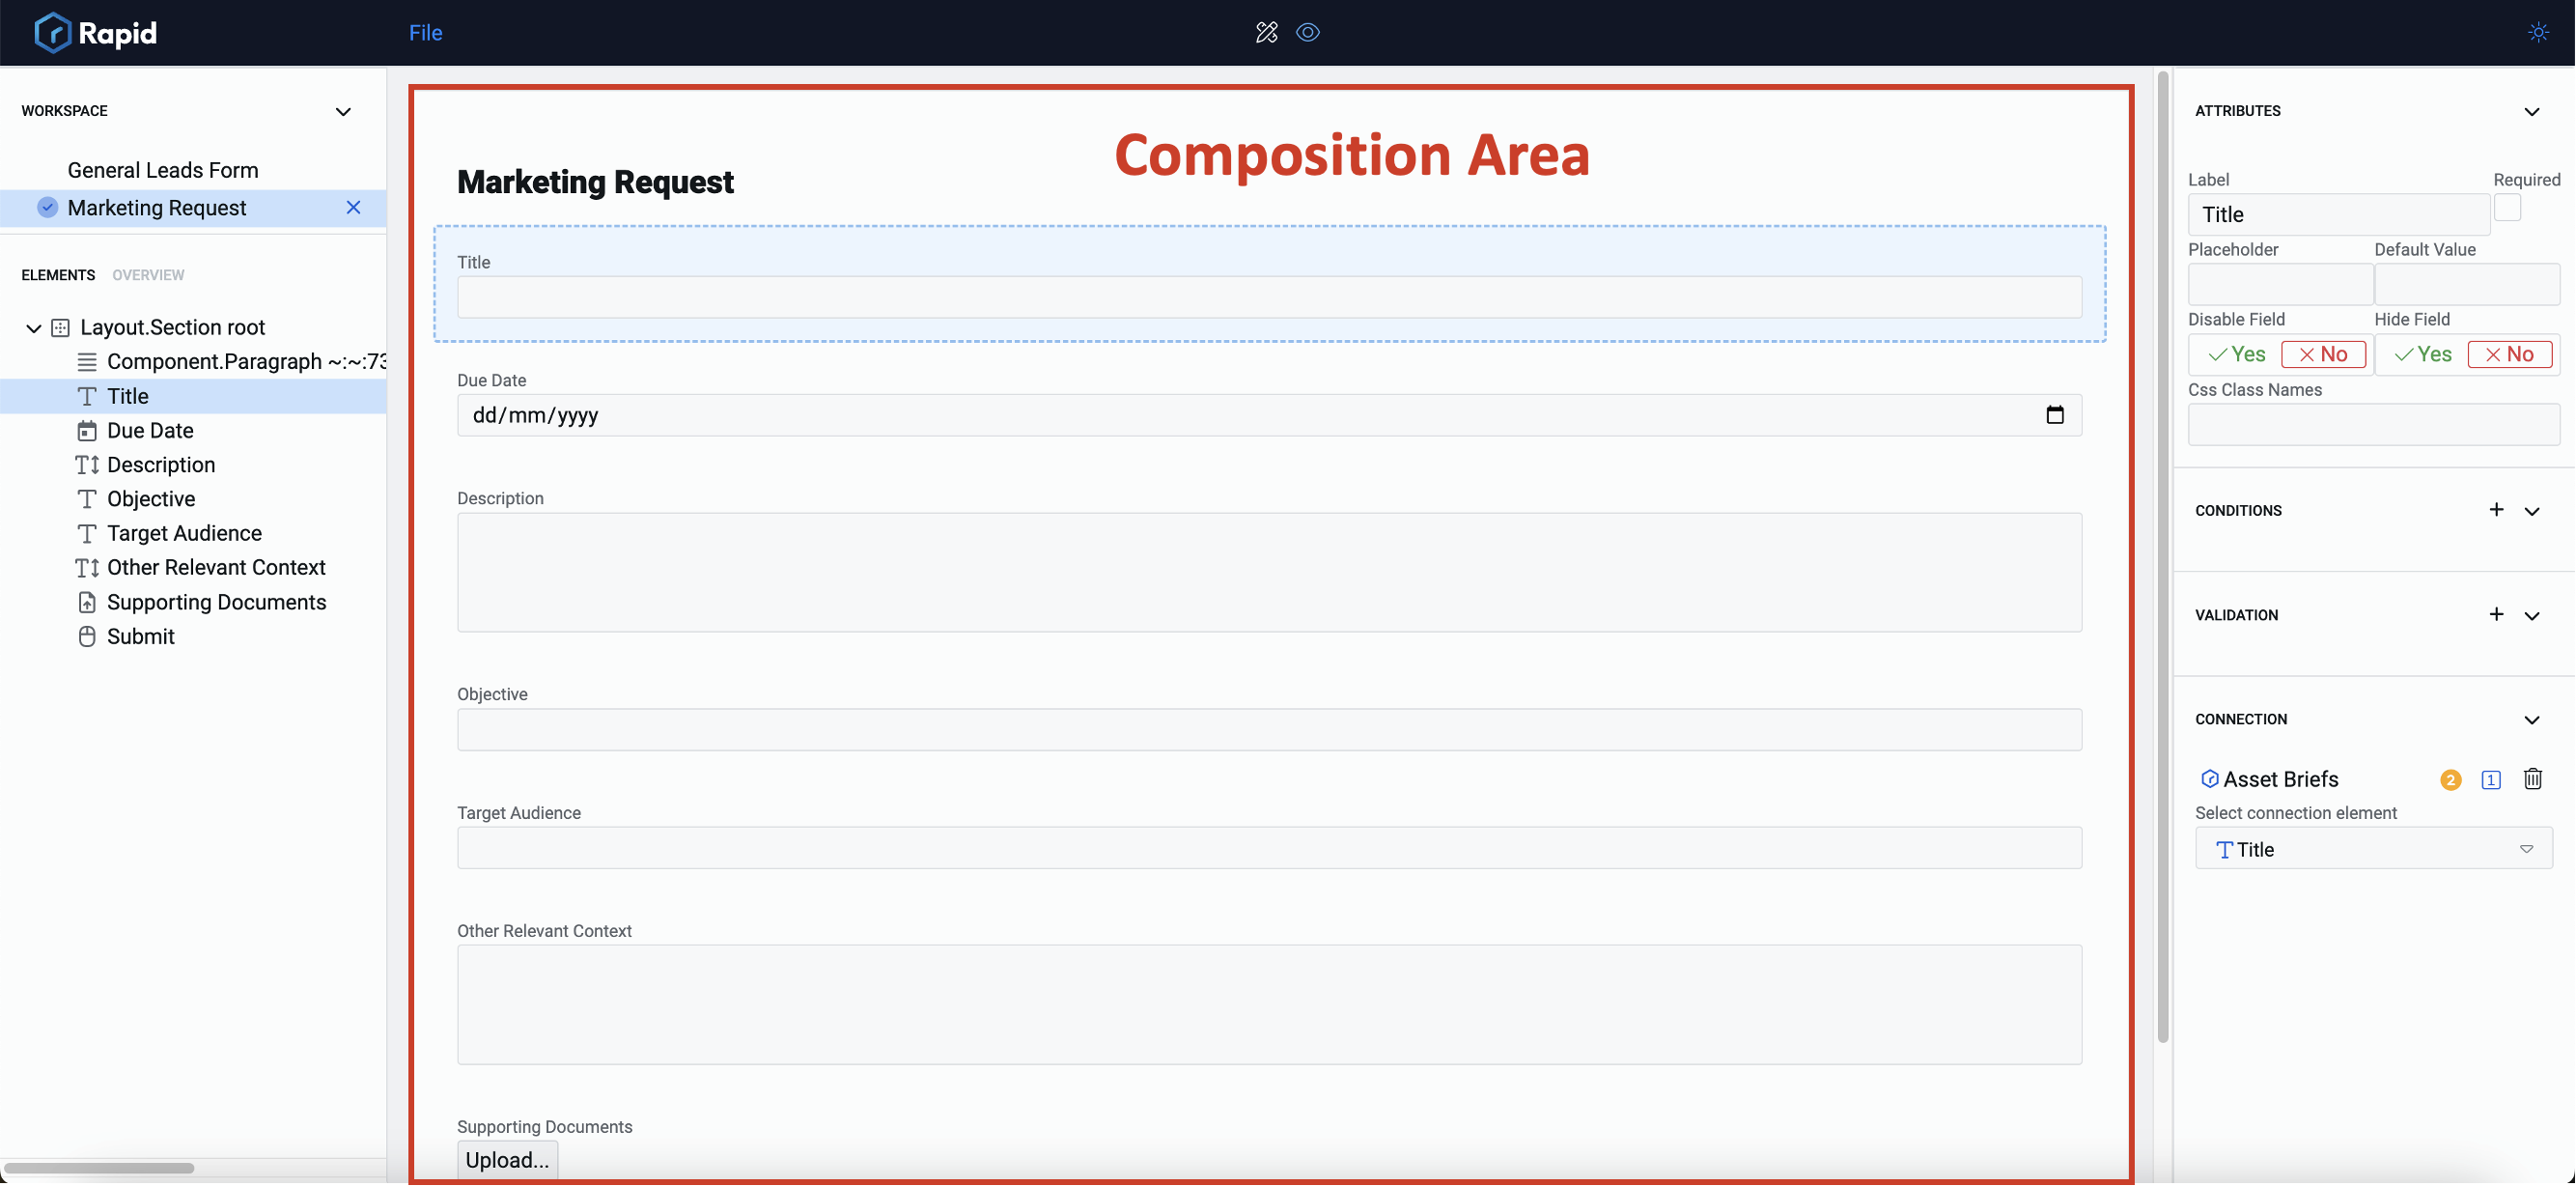
This is the center portion of the Adaptive Document Canvas Adaptive Document Canvas. Here you can add, select and delete elements, and also perceive how various elements will appear visually. Please note this is different from Preview.
Control
A control is the fundamental object which can be configured as an elements. For example - imagine your Adaptive Document has two input fields - First name and Last name. Both of these are configured as different elements over the same control type (Single line).
Element
An element is a control configured with attributes. For example - Imagine your Adaptive document has two input fields - First name and Last name. Both of these are single line input fields (control). These are two different elements which can be present on the composition area.
Element Configuration Panel
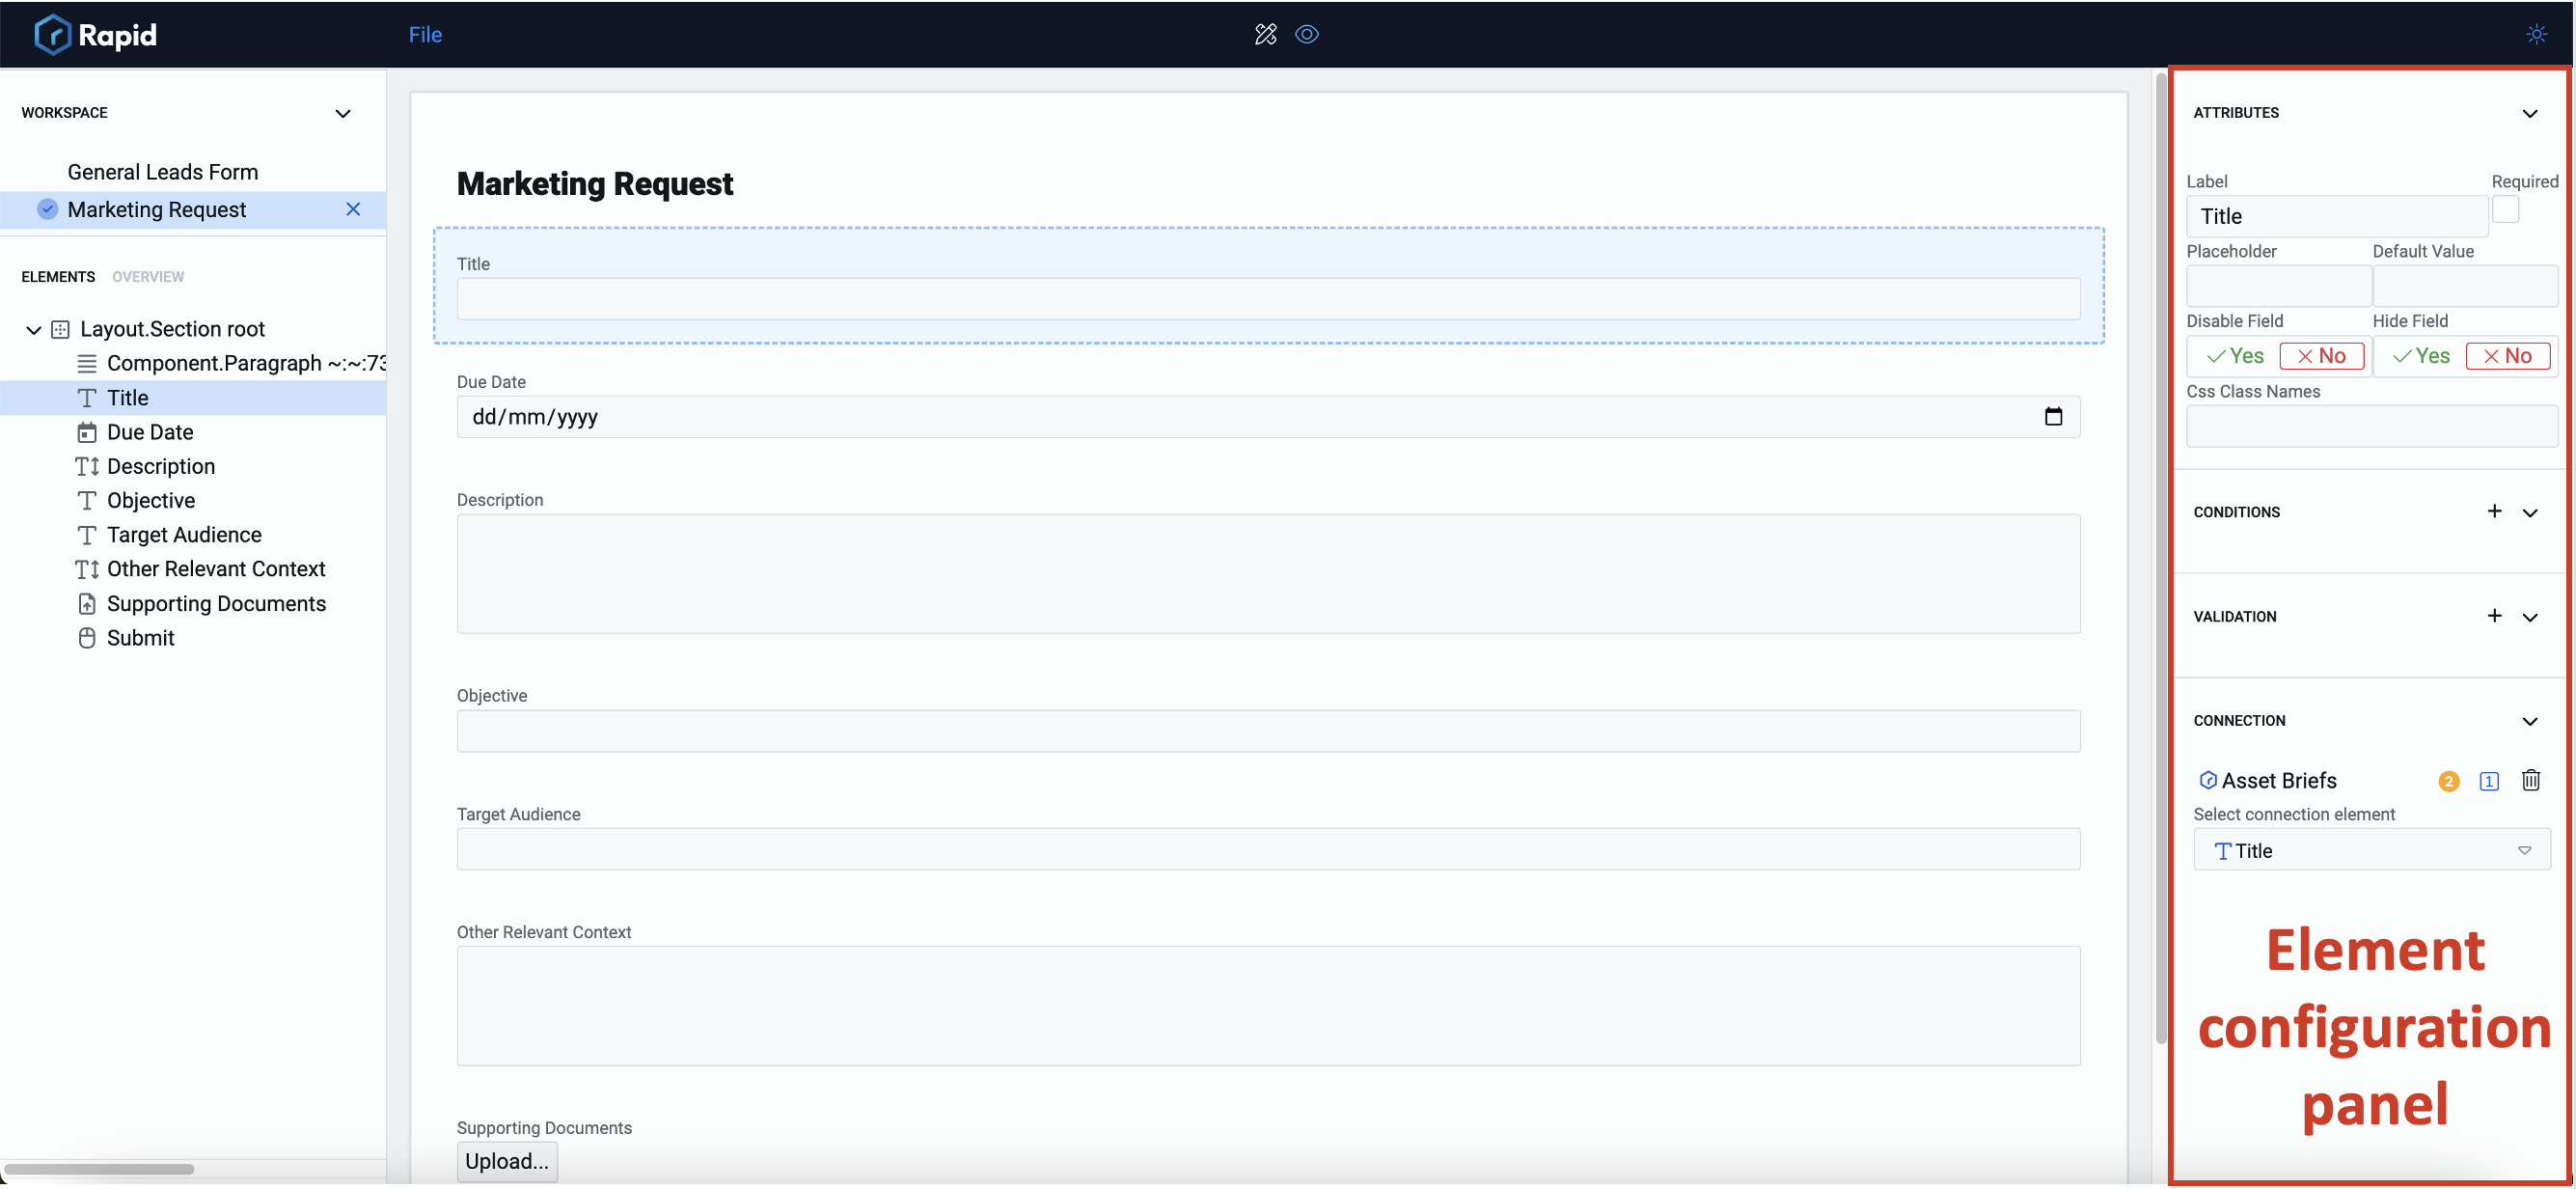
Element configuration panel appears towards the right of the Composition Area. Depending on the nature of the element, this panel will display different configuration categories.
Element Configuration Categories
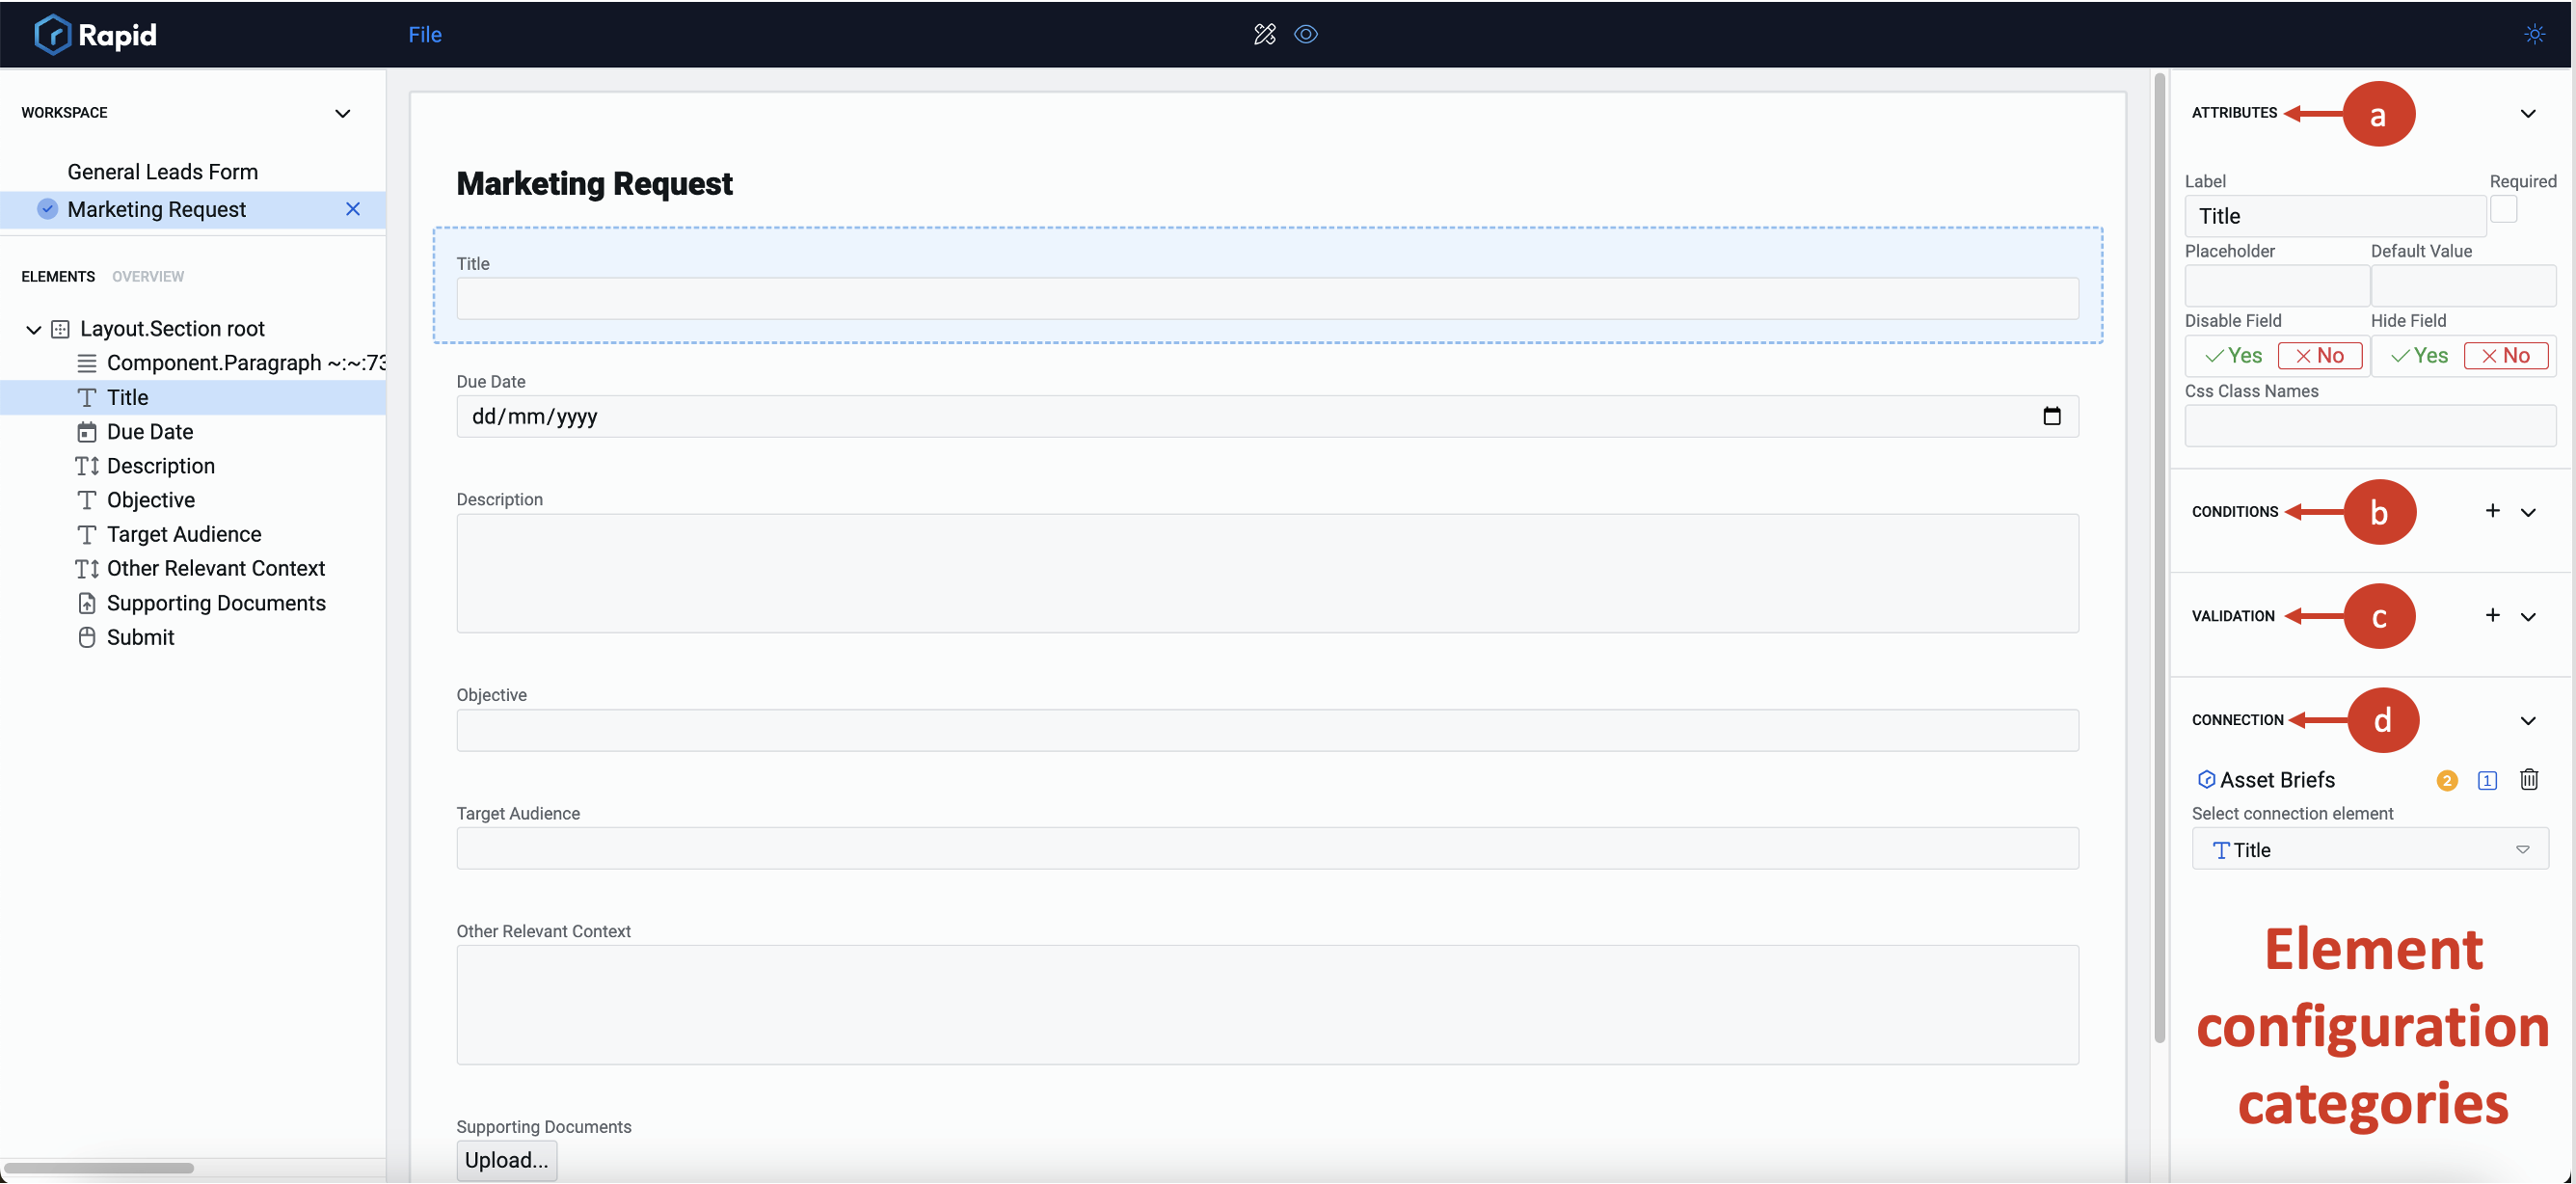
The configuration categories appear in the Element configuration panel. Categories include:
a. Attributes - to define the appearance parameters of the element on the form.
b. Conditions - to define logic which governs conditions when the element can be enabled, or appear etc.
c. Validation - to set element level validation criteria. When the criteria is met, the element will be considered valid, else invalid.
d. Connection - to define the connection of the element with data table's column.
e. Event - To define what actions can be triggered upon click of the element (please note this option is applicable for button elements only.)
f. Choice - To define the choices that will appear in a dropdown element. (please note this option is applicable for choice type elements.)
Based on the nature of the elements selected, configuration categories will appear in the Element configuration panel
Element Picker
The Element Picker enables you to add elements to your document.
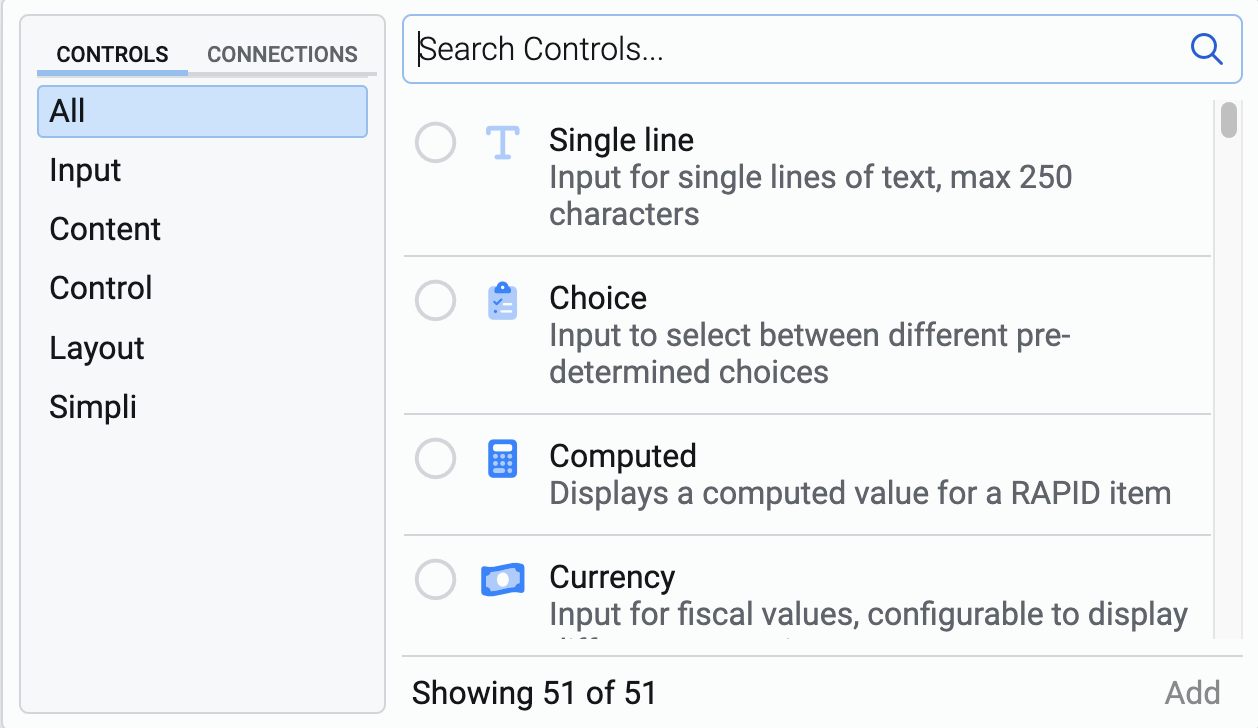
To learn about the various features of the element picker, click here.
Fetch on load
The Fetch on Load flag for a connection controls if data is updated from the site. This ensures that data presented is always up to date for the User. Fetch on load can overwrite values from the documents default values, state values and prefill values.
Fetch on load will only try to get data for an item if it has an ID. This still allows for the creation via default/state/prefill of blank items to be created.
Consider the following conditions:
-
Fetch on Load = Yes AND Item has an ID field
System will fetch the most up-to-date version of the source. -
Fetch on Load = Yes AND Item does not have an ID field
System has nothing to fetch from the source, hence the form will load is as per the form creator's provided values (via default, state and/or prefill) -
Fetch on Load = No
System will load the form as configured by the form creator. (via default, state and/or prefill)
Site URL
Each Rapid install is known as a site. Sites are accessible at https://app.rapidplatform.com/{tenant}/{sitename}
Where
- tenant : Your Azure tenant name
- sitename : The name chosen for the site when first setup